kernel基础知识及环境搭建
Operating System Kernel
操作系统内核(Operation System Kernel) 本质上是一种软件,是应用与硬件的中间层,主要作用是调用系统资源、控制 IO 设备及操作网络与文件系统等
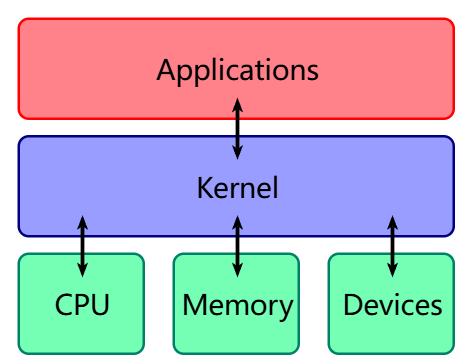
其本质与用户进程无异,都是在物理内存中的代码+数据
不同在于当 cpu 执行内核代码是运行在最高权限,可以完全访问硬件,而执行用户的代码一般在低权限
hierarchical protection domains
分级保护域(hierarchical protection domains),一种将计算机不同资源划分为不同权限的模型,在一些硬件或者微代码级别上提供不同特权态模式的 cpu 架构上,保护环通常是硬件强制的
从最高到最低为 Ring0-Ring3
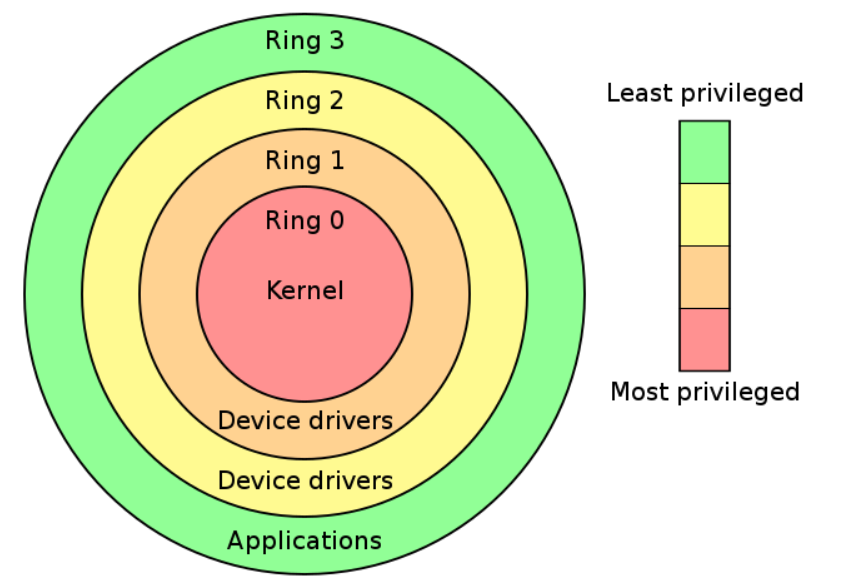
现代操作系统用通常只会使用过 Ring0 和 Ring3,对应内核和用户进程
- 用户态:CPU 运行在 Ring3 + 用户进程运行环境上下文
- 内核态:CPU 运行在 Ring0 + 内核代码运行环境上下文
状态切换
- 中断与异常(interrupt & exception):CPU 收到中断/异常时,切换到 Ring0 ,并根据中断描述符表索引对应代码并执行
- 特权级相关指令:CPU 运行到这些指令时状态发生改变
- iret (0->3)
- stsenter (3->0)
用户态->内核态(系统调用)
发生系统调用、产生异常、外设产生中断等事件时,会进入内核态并用对应的处理程序进行处理
进入内核态后
- 通过 swapgs 切换 GS 段寄存器吗,将其与一个特定位置的值交换,为了保存段寄存器和切换到内核执行的 GS 寄存器
- 将当前栈顶记录在 CPU 独占变量区域里,将里面记录的内核栈顶赋给 RSP/ESP
- push 保存各项寄存器的值
- 通过汇编指令判断是否为 x32_abi(使用 64 位寄存器和调用约定,但将指针限制为 32 位以节省内存)
- 通过系统调用好,跳到全局变量 sys_call_table 相应位置执行系统调用
内核态->用户态
- 通过 swspgs 恢复 GS 寄存器值
- 通过 ssyretq 或 iretq 恢复到用户空间继续执行,使用 iretq 还需要给出用户空间的一些信息(CS,esp/rsp 等)
虚拟内存空间
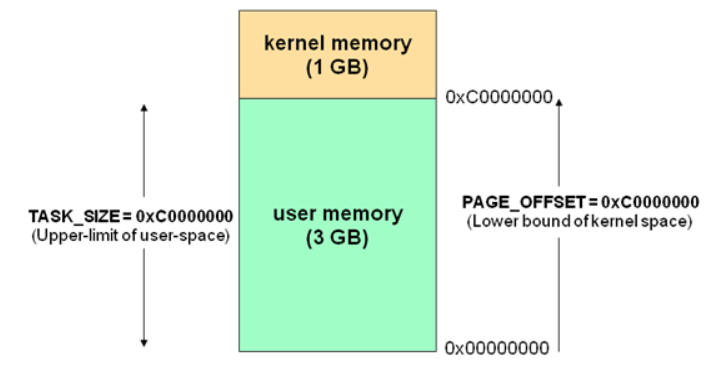
计算机虚拟内存地址空间一般被分为两块
- 供用户使用的用户空间(use space)
- 供内核使用的内核空间(kernel space)
对于 linux 来说,较高虚拟地址被分配给内核,而低虚拟地址给了用户进程
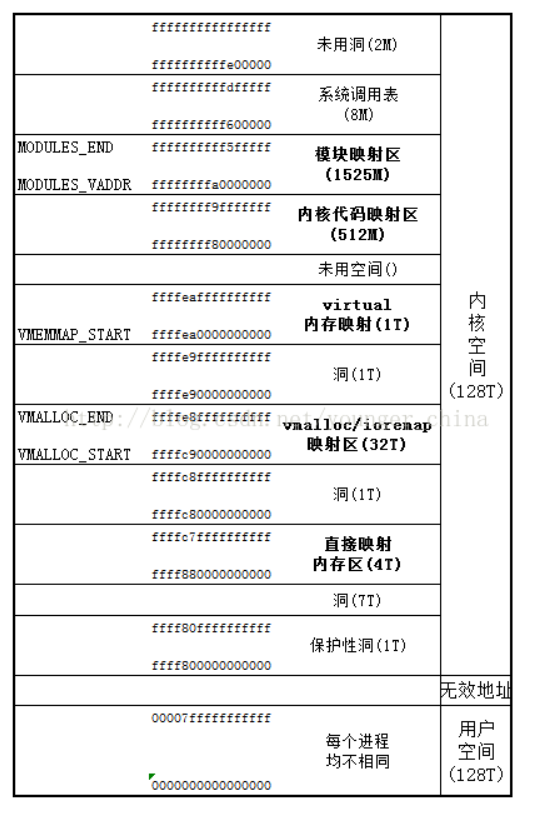
32 位虚拟内存空间布局:
64
进程权限管理
内核调度一切系统资源并为用户应用提供运行环境,相应,应用权限也是由内核进行管理的2
进程描述符(process descriptor)
内核用结构体 task_struct 表示一个进程,该结构体在内核源码 include/linux/sched.h

进程权限凭证(credential)
task_struct 中有如下代码
1 | |
cred 是一个结构体,用以管理一个进程的权限,定义在内核源码 include/linux/cred.h 中
1 | |
一个结构体中记载了一个进程四种不同的用户 ID ,通常情况下这几个 ID 应当都是相同的
真实用户 ID (reak UID):标识一个进程启动时的用户 ID
保存用户 ID(saved UID):标识一个进程最初的有效用户 ID
有效用户 ID (effective UID):标识一个进程正在运行时所属的用户 ID (运行时是可以该表所属用户的)因此权限机制也是利用该 ID 来认证的
内核通过 euid 来进行特权判断,为了防止用户一直在高权限,当任务完成后,euid 会与 suid 交换,恢复进程有效权限
文件系统用户 ID(UID for VFS ops):标识一个进程创建文件时进行标识的用户 ID
用户组 ID 同样分为 4 个,真实组 ID,保存组 ID,有效组 ID,文件系统组 ID,与用户 ID 类似
进程权限改变
只要改变一个进程的 cred 结构体,就可以改变其权限
内核空间由两个函数,都位于 kernel/cred.c 中
struct cred* prepare_kernel_cred(struct task_struct* daemon):该函数用于拷贝一个进程的 cred 结构体,并返回一个新 cred 结构体。需要注意 daemon 参数应为有效的进程描述符地址int commit_creds(struct cred *new): 该函数用于将一个新 cred 结构体应用到进程之中
Loadable Kernel Modules(LKMs)
背景:linux 内核采用宏内核架构,一切系统服务都由内核提供,虽然效率高但是缺乏可扩展性和维护性,所以
-> 可装载内核模块(Loadable Kernel Modules,简称 LKMs)出现了 ,位于内核空间的它可以提供新的系统调用或其他服务,同时其可以像积木一样可以装载进内核或从内核中卸载掉,大大提高了 kernel 的可拓展性和可维护性
常见 LKMs:
- 驱动设备
- 设备驱动
- 文件系统驱动
- …
- 内核扩展模块
LKMs 的文件格式和用户可执行程序相同
- linux:ELF
- windos :exe/dll
- mac:MACH-O
可以用 IDA 等工具来分析内核模块
模块可被单独编译,但不能单独运行。它在运行时被链接到内核上当作其一部分在内核空间运行,这与运行在用户进程的不同
模块通常来实现一种文件系统、一个驱动程序或者其他内核上层的功能
相关指令
- insmod:将指定模块加载到内核
- rmmod:从内核卸载模块
- lsmod :列出已加载的模块
- modprobe:添加或删除模块,modeprobe 在加载模块时会查找依赖关系
大多数 CTF 中的 kernel vulnerability 也是出现在 LKMs 中
内核交互
系统调用
系统调用只用户的程序向操作系统内核请求更高权限的服务,比如 IO 操作或进程间通信
系统调用提供用户程序和操作系统间的接口,部分库函数如 scanf puts 等 IO 相关操作就是对 read write 系统调用的封装
在 /usr/include/x86_64-linux-gnu/asm/unistd_64.h 和 /usr/include/x86_64-linux-gnu/asm/unistd_32.h 分别可以查看 64 位和 32 位的系统调用号。
系统调用:ioctl
在 linux 中,几乎所有设备都被视为文件,这使通过标准文件操作来访问设备更简单,但某些操作超出标准接口(比如 read/write )的能力,比如我要改变设备工作模式或查询设备状态等,这时候就需要 ioctl 了
ioctl:一个专门用于设备输入输出操作的一个系统调用,其函数原型
1 | |
- fd:文件描述符
- request:对设备的指令
- 再后边的参数就是一些与设备有关的补充参数
常见内核态函数
内核中不可使用 C 库函数,但是内核中有其对应的各种函数
- printf()->printk() 但是要注意其不一定把内容显示到终端上,但一定在内核缓冲区中,可用 dmesg 查看效果
- memcpy()->copt_from_user()/copy_to_user()
- 第一个将用户空间数据传到内核空间
- 第二个则相反
- malloc()->kamlloc 内核的内存分配函数,和 malloc() 类似,但使用的使 slab/slub 分配器
- free()->kfree()
改变权限的函数
- int commit_creds(struct cred *new)
- struct cred* prepare_kernel_cred(struct task_struct* daemon)
执行 commit_creds(prepare_kernel_cred(&init_task)) 即可获得 root 权限 ,也是最常用的提权手段,函数名及变量可在 /proc/kallsyms 中查看
保护机制
通用保护机制
KASLR
内核空间地址随机化,与用户程序的 ASLR 类似,在内核镜像映射到实际地址空间时加上一个偏移值(粒度 256MB),但是其内部相对偏移任然不变
对于未开启 KASLR 时,内核代码段基址为 0xffffffff81000000 ,direct mapping area (直接映射区)的基址为 0xffff888000000000
FGKASLR
函数粒度的内核地址空间随机化,是对 KASLR 保护的加强版
KASLR 虽然能够一定程度上缓解攻击,但若攻击者获取到了内核中某个地址,仍然可以通过偏移从而得到整个内核地址空间布局
该保护方式使内核在编译时把每个函数做成独立的代码块,启动时内核会随机排列这些函数的顺序再拼起来,这样
- 函数之间偏移就是随机的了
- 无法通过泄露一个函数的地址而知道整个内核的地址空间排布
STACK PROTECTOR
类似 canary,通常又称 stakc cookie,检测是否发生栈溢出,若发生则产生 kernel panic
内核中的 canary 值通常取子 GS 段寄存器某个固定偏移处的值
SMAP/SMEP
SMAP 即 管理模式访问保护(Supervisor Mode Access Prevention),SMEP 即管理模式执行保护(Supervisor Mode Execution Prevention)
通常同时开启
- SMAP 阻止内核态访问用户态内存的数据(除非显示允许)
- SMEP 阻值内核态直接执行用户态内存中的代码
KETI
内核页表隔离 (Kernel page-table isolation) ,内核空间和用户空间分别只用两组不同的页表,这对于内核的内存管理产生了根本性变化
两张表都有对用户内存空间的完整映射,但在用户页只影射了少量内核代码(如系统调用入口点,中断处理等),只有在内核页表中才有对内核内存空间的完整映射
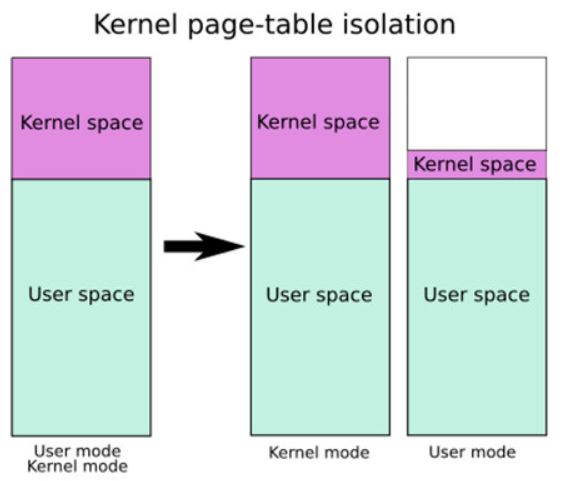
主要用来缓解 Meltdown 漏洞
KPTI 同时令内核页表中属于用户地址空间的部分不再拥有执行权限,是 ret2usr 不再可用
内核“堆“上保护机制
Hardened Usercopy
一种用以在用户空间和内核空间之间拷贝数据时进行越界检查的机制,主要检查拷贝过程是否会对内核空间的数据进行越界读写 :
- 读取数据长度是否超过 object 范围
- 写入的数据长度是否超过 object 范围
这种保护用户 copy_to_user() 与 copy_from_user() 等数据交换的 api 中,不过不适用于内核空间内的数据拷贝
Hardened freelist
类似于 glibc-2.32 加入的保护,开启保护后 free objext 的 next 指针存储的是以下三个值进行异或操作后的值
- 当前 free object 地址
- 下一个 free object 的地址
- 有 kmem_cache 指定的一个 random 值
所以攻击者至少获取到第一或第三个值才可以篡改 freelist
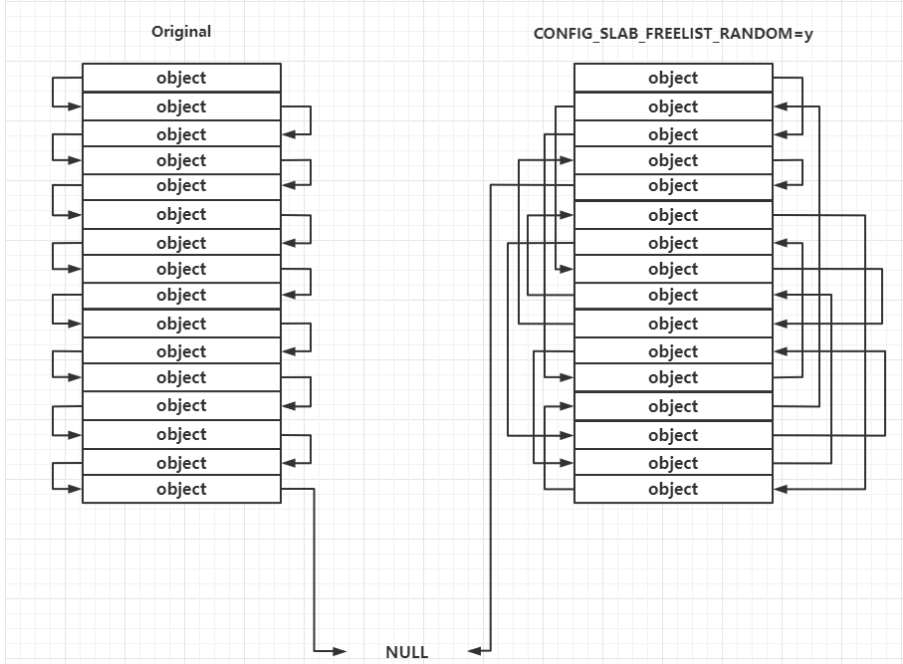
Random freelist
发生在 slub allocator(管理小内存的分配和释放)向 buddy system(管理内存页的分配和释放)申请到页框之后的处理过程中,对于未开启的,其上的 object 连接顺序是线性的,但开启后会变成随机的,使攻击者无法预测下一个分配的 objext 地址
运行时 freelist 的构成仍然遵循 LIFO
CONFIG_INIT_ON_ALLOC_DEFAULT_ON
内核进行堆内存分配时,会对分配的内存上的内容进行清零
CTF kernel pwn 相关
传统 kernel pwn 题目会给以下三个文件
- boot.sh 一个用于启动 kernel 的 shell 脚本,多用 qemu,保护措施与 qemu 不同的启动参数有关
- bzLmage:内核启动映像
- rootfs.cpio:文件系统映像
源码相关
下载
镜像站:https://mirrors.tuna.tsinghua.edu.cn/kernel/
1 | |
验证签名
为了确认内核是否被恶意篡改
下载工具
1 | |
导入公钥
1 | |
下载内核签名
1 | |
验证签名
1 | |
报警告是因为导入的公钥没有可信的签名,无法证明其确实来自 Linus Torvalds 和 Greg Kroah-Hartman ,可以选择用 TOFU 信任签名
1 | |
重新验证
1 | |
不再警告
解压压缩包
1 | |
配置编译选项
利用图形化界面调整编译选项
1 | |
需要以下工具
1 | |
如果不想要交互式,直接调整 .config 文件或者
1 | |
这里我们主要关注调试方面的选项,依次进入到 Kernel hacking -> Compile-time checks and compiler options,然后勾选如下选项 Compile the kernel with debug info ,以便于调试。这通常是默认开启的。
6.12.16 中我没找到该选项,问了问 AI,Kernel hacking -> Compile-time checks and compiler options->Debug information 中选择 Generate DWARF Version 4 debuginfo 也可以
如果要使用 kgdb 调试内核,则需要选中 KGDB: kernel debugger,并选中 KGDB 下的所有选项。linux-5.15.513 中貌似就没有该选项了,据说是默认开启
编译内核
通常我们要获取的是压缩后的内核镜像文件 bzImage,利用如下命令进行编译
1 | |
可以用全部核心来提高编译速度
1 | |
用全部
1 | |
出现
1 | |
说明编译完成
关注以下两个文件
- vmlinuz:编译生成的 ELF 格式的原始内核镜像文件,通常位于源码根目录下。
- bzImage:前者进行压缩后的内核镜像文件,通常位于 arch/架构/boot/bzImage (注意对于 x86-64 而言仍是 x86 目录)
常见内核文件格式
- vmlinux:未压缩的可执行内核映像(ELF),该文件常在生成 vmlinuz 过程中长生,适合调试用,并非 bootable(可启动的)
- vmlinuz:压缩内核镜像(通常 gzip 压缩),bootable,用于实际 linux 系统启动,位于 /boot 目录下
- zlmage:较老的压缩镜像内核,适用于小于 512KB 的内核,启动时加载的到内存低地址(0-640KB),可理解为小内核时代的压缩可启动文件
- bzImage:现代内核压缩镜像(big zImage),适用于较大内核(>512KB)启动时加载到高地址(>1MB),gzip 压缩,但开头包含解压代码我,不能用 gunzip,可理解为现代 linux 标准启动镜像,能装大内核
- vmlinux.bin:原始内核的纯二进制文件,去符号表和调试信息,bootable
生成命令
1 | |
- uImage:U-Boot 专用镜像,在 zImage 前加了 0x40 长度的 header tag,包含镜像类型,加载地址,生成时间,大小等,嵌入式设备使用 U-Boot 启动 linux 时会用到
BusyBox构建文件系统并启动内核
下载,这里选择 1.36.0 的版本
1 | |
解压
1 | |
编译
进入图形化配置界面
1 | |
勾选 Settings--->Build static binary file (no shared lib) 以构建不依赖于 libc 的静态编译版本
进行编译
1 | |
配置文件系统
进入编译后的 _install 文件夹
创建基本文件结构
1 | |
在 ./etc/inittab 中写入如下内容
1 | |
指定初始化脚本为 /etc/init.d/rcS ,接下来在该文件写入如下内容
1 | |
接着添加权限
1 | |
接着配置用户组相关权限,这里简历两个用户组 root 和 ctf ,以及两个用户 root 和 ctf ,并配置一条文件系统挂载项
1 | |
打包文件系统
这里用 cpio 格式打包
这里进入 _install 文件夹下
1 | |
可以放在自己喜欢的位置
解包的指令
1 | |
启动内核
将 bzImage 和 rootfs.cpio 放入同一文件夹下,并创建 start.sh ,启动脚本
脚本中写入
1 | |
- -m:虚拟机内存大小
- -kernel:内核镜像路径
- -hda:文件系统路径
- -monitor:将监视器重定向到主机设备 /dev/null ,防止 CTF 中被人通过监视器直接拿到flag
- -append:内核启动参数选项
- root=…:设定根文件系统所在设备
- kaslr:开启内核地址随机化
- rdinit:初始启动进程
- loglevel=3&quie:不输出 log
- console:指定中断为 /dev/ttyS0,这样一启动就能进入终端
- -cpu:设置 cpu 选项,这里开启 smep 保护
- -smp:设置对称多处理器配置,这里设置两个核心,每个核心一个线程
- -nographic:不提供图形化界面,此时内核仅有串口输出,输出内容被 qemu 重定向到我们的终端
- -snapshot:使用快照的方式启动
- -s:相当于 -gdb tcp::1234 的简写,后续直接使用 gdb 连接本地端口进行调试
调试分析
方便调试可使用 root 用户启动 shell,修改 rcS
1 | |
ctf 改为 root
可关闭随机化,即 kaslr->nokaslr
基本操作
可通过 /proc/kallsyms 获取特定内核符号信息
1 | |
可通过 lsmod 查看装载的驱动信息
可读取 /sys/module,获取更加详细的内核模块信息
1 | |
启动调试
利用 gdb 连接到端口进行调试
1 | |